![Samsung A72 5G FRP Bypass [Android 11,12] Without PC 2024](https://mobfrpfile.com/wp-content/uploads/2024/01/Untitled.png "Samsung A72 5G FRP Bypass [Android 11,12] Without PC 2024")
Are you attempting to circumvent FRP on Samsung A72 5G Android 11 without a computer? So, here I am. In this essay, I will show you how to perform a Samsung A72 5G FRP Bypass Android 11 without the need for a PC (Personal PC) or a SIM card (Umm, I mean without using any pin-locked SIM card). If you want to fix your Samsung phone, I recommend that you carefully follow these FRP lock bypass complete instructions.
Without Alliance Shield, Samsung A72 5G Android 12 FRP Bypass
The FRP Bypass approach is a dynamic procedure. Every week, Google releases new security improvements, and the old frp look removal technique no longer works. On my website, I always attempt to keep the frp solution up to date. So, for the finest FRP SAMSUNG A72 5G bypass solution, carefully follow these procedures.
Android 12 FRP Bypass Samsung A72 5G [New Method]
We will detail the Samsung A72 5G FRP Bypass technique using the Samsung FRP Bypass Tool V1.5 in this manner. This tool works well on the most recent Samsung phones. So, let’s get this party started.
We shall attempt to discuss the process in detail. As a result, you can easily bypass FRP on the Samsung A72 5G using the Samsung FRP Bypass Tool. First and foremost,
-
FRP Bypass must be downloaded, extracted, and installed.
- Start your PC.
- Chrome can be launched from the taskbar or the Start Menu.
- Get the Samsung FRP Bypass Tool V1.5.
- Now use WinZip or Winrar to extract the zip file.
2. Make sure the file is excluded from antivirus or disable it.
- To have the file taken off of the antivirus list, you need to –
- From the Start menu, go to Settings.
- After that, click on Security & Update.
- It’s where you can find the settings for virus and threat protection.
- It’s under “Virus & Threat Protection Settings” on the left side of the screen.
- Click on Take Care of Settings.
- Next, go to Exclusions and click on Add an Exclusion.
- Add the.exe file now.
- Okay, that’s it.
3. It’s also possible to turn off your antivirus or Windows Defender. To turn it off –
- Click on Manage Settings under Virus & Threat Protection Settings.
- Real-time Protection should then be turned off.
Any file you download or install will not be scanned by the protection if this is turned off.
Return to the Samsung A72 5G FRP Bypass procedure now:
- Activate your Samsung A72 5G device that is FRP-locked.
- Establish a robust WiFi network connection.
Make sure the phone and computer are properly connected. [This is significant]
- Use a USB cable to connect your phone to your computer.
- Next, navigate to your computer’s Device Manager. [You can look for the device manager on the Start menu to launch it.]
- Check the Samsung portable device or mobile USB modem that appears now. [Note: Reconnect your phone to your computer and install the Samsung USB Driver from the extracted folder if it is not visible.]
- Launch and open the Samsung FRP Tool.exe now.
- Select the Direct Unlock – Android 9/10/11/12 button located at the bottom right of the display.
- Your phone’s information and identification will be automatically detected.
- A popup screen will then appear after that. Avoid clicking “Okay” on it.
- Pick up your phone now and head to Emergency Call. Press *#0*# to enter Test Mode.
- Next, on the computer screen, click OK.
- On the screen of your phone, enable USB Debugging. [Click OK after making sure this machine always permits.]
- Restart your smartphone after waiting for the program to reset the FRP Lock.
How to Remove Samsung A72 5G FRP Without a Computer?
This is the most recent functional method for bypassing the FRP lock on the Samsung A72 5G cellphone running Android 11 (tested). In this step, I will demonstrate the simplest methods for bypassing frp on the Samsung A72 5G without the use of a computer. So simply follow me…
What Equipment Do I Need To Use This Method?
- Unlocked Samsung FRP Phone
- A SIM card that includes a data package.
- Having a Samsung Account
To begin, you will require minimal preparation to carry out this method. You’ll need an unlocked Samsung phone to achieve this. You must do the following on the Unlock phone:
- Please sign in to your Samsung account.
- Then, on your unlocked Samsung cellphone, download and install the two apps listed above (1. Notification Bar.apk, 2. Package Disabler Pro.apk).
- You must backup these applications to your Samsung account after installing them. Please follow these instructions:
- Navigate to Settings > Accounts and Backup > Click on “Back Up Data” on the Samsung cloud > deselect everything except “Apps” > and finally click on “Backup Now.”
![Samsung A72 5G FRP Bypass [Android 11,12] Without PC 2024](https://mobfrpfile.com/wp-content/uploads/2023/11/1-1.jpg)
We have now successfully unlocked the Samsung A72 5G phone using the same Samsung account that we used to log in. Please take great note of the frp bypass procedure.
The Process of Samsung A72 5G FRP Bypass Initiated
Regarding the Samsung A72 5G FRP-locked device:
# Step 1: Select the Settings app on your Samsung phone.
- You can insert a SIM card without having to establish a wifi connection.

Use the Side and Volume UP keys to press and hold for three seconds, then tap “Use.”
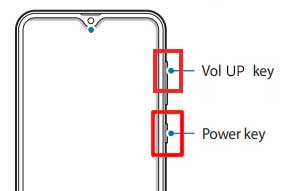
Once more, to activate TalkBack, press and hold the Side and Volume UP keys for three seconds. (Note: You must tap or press the choice for doing anything twice when the talkback is enabled.)

On the phone screen, draw a reverse L. Tap “while using the app,” then double-click. Now choose “Use Voice Commands” > and speak “Google Assistant” aloud. (Try this method again if it doesn’t work the first time.)

Alright, the Google Assistant has finally launched. Use the Side and Volume UP keys to turn off the talkback.
![Samsung A72 5G FRP Bypass [Android 11,12] Without PC 2024](https://mobfrpfile.com/wp-content/uploads/2023/11/6-1.jpg)
“Hey Google, open settings,” exclaim aloud. It’s okay if the settings are open. If it’s not open, however, simply tap the Google icon as seen in the image.

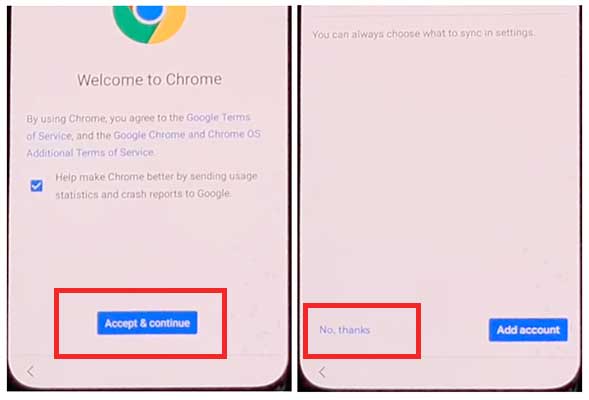
Click the “Voice” icon now, then say “Hey Google, open Chrome” aloud.

After selecting “Accept & continue,” select “No thanks.”
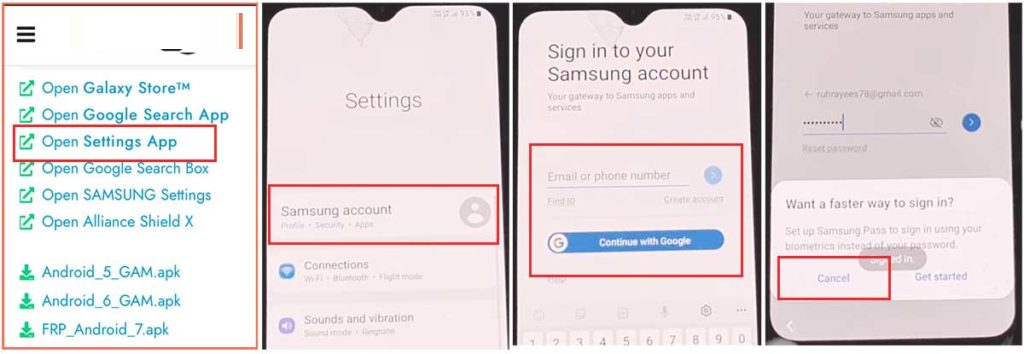
#Step2: Access your Samsung Account by opening the Settings.
- “To log in to your Samsung account and cancel the “Faster way to sign in,” click “Open Settings App.”
#Step 3: Turn on the Accessibility Button
- Return to settings by tapping the return icon, then scroll down and tap on “accessibility” > Interaction and dexterity > Universal switch > continue pressing “Next,” then click “Done.”

- Now go back to settings and click on “Universal switch shortcuts” > Turn it On > Allow > enable the “Accessibility button” and then back to settings.

#Step 4: Backup and restore the previous data
- Select Accounts and Backup from the settings. Then, simultaneously select Restore Data and Accessibility. Finally, check all items and hit Restore.
- Next, select Install Backup and press Done.
#Step 5: Install the Galaxy Store’s S7, S8, and S9 Launchers.
- To access Samsung Apps and Services > Galaxy Store, select Samsung Account. Update the Samsung Galaxy right now.
- The update appears to be “installing” after it has finished downloading. Next, press the back symbol. (If it appears to update again, repeat the process.)
- Click the Samsung Galaxy Store again, then select Agree. Proceed > Skip > Click the search icon to look for it here. “Launcher for Galaxy S7, S8, S9” > Put it in place > Select “Open” by clicking.
#Step 6: On the Package Disabler Pro Application, select “Allow management of all files.”
- The programs “Notification Bar” and “Package Disabler Pro” are visible in the Apps list.
- Proceed to the Files and Media > Settings > Privacy > Permission Manager > Click the three dots in the top right corner, select Show System, then locate “Package Disabler Pro” and click “allow management of all files” to grant the software permission.
#Step 7: Notification Bar Application Settings
- Return to the home screen, select the “Notification Bar application,” and then To enable the notification bar, choose Accessibility > Installed Service > Notification Bar >.
- Return and select Notification > to enable the Notification Bar.
#Step8: On the Package Disabler Pro app, activate KNOX Validation.
- Select “Package Disabler Pro” from the list of installed apps by tapping the Back button, then click to open it. (First, switch off all internet connections (Wifi and SIM Net) before proceeding. If mobile data continues, take out the SIM card.)
- Once the program opens, select “I agree” and then click “Enable Admin” before selecting “Activate.”
- After selecting “I have read and agree,” press the “Confirm” button. (You must connect your phone to the internet for this operation, so insert the SIM card once more.)
- Alright, it could say “Retry” when you hit the “Confirm” button. Don’t worry, just click the “Retry” tab once more.
- The message “Knox license validation completed successfully” is now displayed to you.
#Step 9: Last Action, Disable the Samsung FRP Lock
- The “Please wait” screen will show up at this phase.
- After tapping the search icon, locate “Setup.” First, choose “Android Setup” from the search results, then check the “Disable” option and press the Back symbol.
- Select “Samsung Setup Wizard” and then “Clear Data.” (The notification bar will display “Time” when you delete the Samsung setup data. This indicates that your Samsung FRP Bypass was successful.)