The majority of Xiaomi Redmi 9A smartphones are equipped with the FRP lock functionality. The Android operating system developed by Google has incorporated a security measure known as Factory Reset Protection. The inclusion of this crucial attribute serves the purpose of mitigating the potential misuse of the gadget in instances of theft. Nevertheless, several individuals have had difficulties as a result of their failure to recall their login credentials, such as their Google email address or password, subsequent to performing a complete reset.
In this post, we will demonstrate the seamless circumvention of Factory Reset Protection (FRP) on the Xiaomi Redmi 9A MIUI 12 device. Additionally, we will elucidate the process of unlocking the Gmail lock without the need for a computer, by adhering to a concise set of instructions. This post aims to provide a comprehensive explanation of the process involved in doing a Redmi 9A MIUI 12 FRP Google Account Bypass in the year 2023.
FRP Lock On Redmi 9A:
FRP functionality has been enabled for Android OS smartphones released since Lollipop. The process of bypassing FRP in the latest iterations of Google’s Android is becoming increasingly intricate, as it varies by phone, operating system, and version.
The FRP bypass approach is completely free, and you may utilize the compatible FRP bypass software application on your device. Additionally, we have incorporated the latest FRP Bypass APK, which can aid you in effectively circumventing FRP on your Xiaomi.
Redmi 9A MIUI 12 FRP Bypass:
- It is simple to bypass the FRP on your Xiaomi device. You must follow the instructions outlined below.
- The steps to bypass the Xiaomi Redmi 9A FRP are as follows:
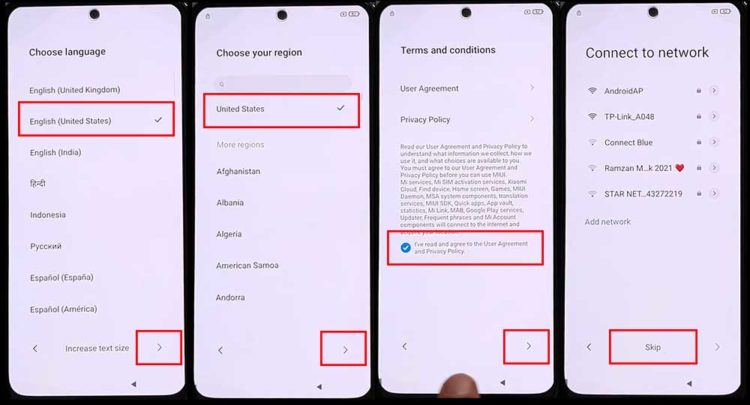
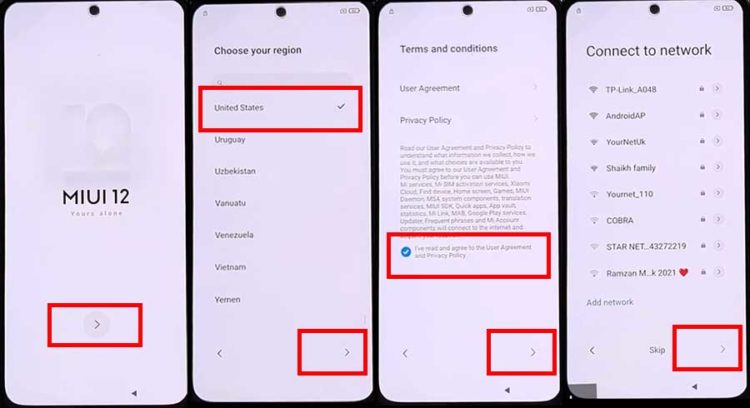
- Continue > Choose a language > Select your nation > Examine the I’ve read and agree > Remove this step > Continue > Skip this option when it comes to connecting to WiFi.
- Select More > Permit > Momentarily pause > Proceed > Next > Tap Next on the configuration completion page.
![Xiaomi Redmi 9A FRP Bypass [Google Account Unlock]](https://mobfrpfile.com/wp-content/uploads/2023/11/2.jpg)
- There will be an interface displaying the following: “Not registered in. Before you can use this phone, you must authenticate with the owner’s Google Account. Tap the SETUP PHONE option thereafter.
![Xiaomi Redmi 9A FRP Bypass [Google Account Unlock]](https://mobfrpfile.com/wp-content/uploads/2023/11/3.jpg)
- Select a language before tapping “Next.” Select your region, then select “Next.” Ultimately, establish a WiFi connection.
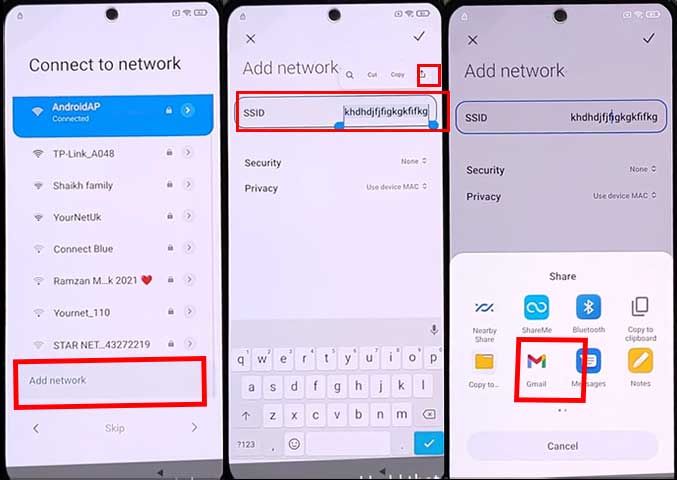
- After scrolling down, select “Add network.” Enter some text into the SSID field, then press and hold that.
- When the “Share icon” is tapped, keep down the “Gmail App” icon.
- The application’s “Notifications” and “Additional settings” should be selected.
- Click the “three dots” in the upper-right corner and choose “Help and feedback.”
![Xiaomi Redmi 9A FRP Bypass [Google Account Unlock]](https://mobfrpfile.com/wp-content/uploads/2023/11/6.jpg)
- Initiate a search for the article “Delete or disable applications on Android.”
- Tap to access “Applications settings” > conduct a search for “Settings” > launch the application.
![Xiaomi Redmi 9A FRP Bypass [Google Account Unlock]](https://mobfrpfile.com/wp-content/uploads/2023/11/7.jpg)
- Open “Additional settings” after finding it.
- Navigate to “Accessibility.”
- Select “Accessibility Menu” and then “Accessibility Menu Shortcut.”
![Xiaomi Redmi 9A FRP Bypass [Google Account Unlock]](https://mobfrpfile.com/wp-content/uploads/2023/11/8.jpg)
- Return to the Android article to delete or disable the program, and then tap to access “Application Settings” once more.
![Xiaomi Redmi 9A FRP Bypass [Google Account Unlock]](https://mobfrpfile.com/wp-content/uploads/2023/11/10.jpg)
- press to go to “Applications settings,” then press “More” and select “Show system.”
![Xiaomi Redmi 9A FRP Bypass [Google Account Unlock]](https://mobfrpfile.com/wp-content/uploads/2023/11/11.jpg)
- Open “Android Setup” by searching for it. Then, Force stops the program, disables it, and Clears cache data.
- There will be another Android installation. Go to the second Android Setup, then Force Stop and erase the cache.
![Xiaomi Redmi 9A FRP Bypass [Google Account Unlock]](https://mobfrpfile.com/wp-content/uploads/2023/11/13.jpg)
- To deactivate the application, choose “Carrier Services” followed by “Clear storage,” “Force stop,” and “Stop.”
- Uninstall the application by selecting “Google Play Services” followed by “Clear storage” and “Force stop.”
- Returning to the WiFi Setup screen, tap the Next button.
- An interface will be presented that displays— Preparing your phone… Just a moment… Awaiting any developments…
- After tapping the Shortcut icon in the Accessibility menu, select Google Assistant.
- Select the “Settings” option followed by “Enable Google Play Services.”
- After performing a single backtap, select Skip next to Sign in to your MI account.
- Once more, tap Skip next to Set password.
- After selecting Next under Additional Settings, select Skip.
- You will then observe the interface Setup Complete. Select Next.
(FAQs)
Does FRP Lock Appear on All Android Smartphones?
No, FRP isn’t present on every Android smartphone. The Lollipop operating system has been configured using the FRP lock system. It is not included in Operating Systems with lower versions.
Can I Use My Xiaomi 9A’s FRP Bypass Without a PC?
With or without a PC, you may circumvent FRP on the Xiaomi 9A and other Android phones. The aforementioned procedures are carried out without the use of a PC.
Final Note
Gmail Account Authentication, or FRP, has drastically changed how we can access lost-and-found phones in the most recent versions of the Android OS; the factory reset method alone is no longer sufficient to unlock the device. When someone hard resets a lost device and loses the login information for the synchronized account, they are effectively locked out. It is simple to get around FRP on your Xiaomi 9A and other Android phones, but doing so will erase your Gmail account’s login information from the device. Thus it is best to exercise caution.